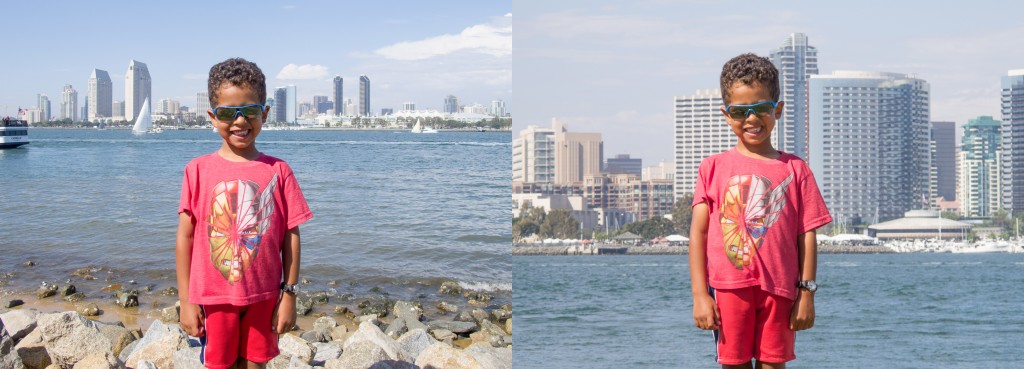
Learning some simple techniques and what your camera can do will allow you to take CONTROL of many aspects of your photos. In this case, I’ll teach you how to “move” the background closer or farther away in your photos.
What you will need: Any camera with a zoom lens. (yup, that’s it!)
Here’s how:
1) To make a picture like the one on the left, zoom OUT (wide field of view). Notice where your subject’s head and legs are. Take the shot.
2) To make a picture like the one on the right, move back with your FEET, then zoom in with your camera lens. Keep moving your body with your feet to compose the image so that your subject is approximately framed in the same way as the first picture (head and legs). Take the shot!
See a video that SHOWS you how to do this below.
Tips: Make great pictures with your smartphone


“What you will need: Any camera with a zoom lens. (yup, that’s it!)”
This doesn’t work on a Smart Phone does it? I think that when you rely on digital zoom, you just get a crappier photo (IMHO).
Brian, you are absolutely correct. I should have been more clear. It needs to have an optical (not digital zoom). I overlooked writing that as I never use digital zoom. Smartphones (typically) do not have optical zoom. This technique will work with point and shoots and compacts (and of course SLRs) with an optical zoom lens.
Very cool and informative article/video. Can’t wait to try this out soon 🙂
Thank you for this great tip ! and the video is awasome
Yes, this is one of those orange-free articles. The lack of an optical zoom is my greatest frustration with my smart phone as a camera. I try to look at it as a challenge to make a different kind of image from what I would have gotten with a zoom or telephoto, but there are many situations where I just can’t compose a good shot with that relatively wide lens. Maybe after hanging around here a while, I’ll get better at it!
Loved the video too. Sean was fantastic! and the references to movies. 🙂
This was a great tutorial on something I had never even thought of! So many tricks of the trade you are sharing! Loved the video — it made it very clear how to work this technique.
Thank you for the tutorial. Great job, I will try this next time out!
Amazing difference in photos! Now I’m going to re-watch Jaws to notice this technique. 🙂
Great content and very easy to use and put into practice 🙂
Great video demonstration – clear, concise, and I loved the examples from Hollywood movies.
What is your opinion about how much body to include in various shots? I’d love to hear more about that.
Emily, as with many photo situations, the answer is “it depends”, but here are a few pointers to keep in mind. The larger the group in the photo, the more difficult it’s going to be not getting more body in the shot. Personally, I like to zoom in, walk closer, crop tighter to get more expression than more body. The exception might be if the body and outfit / clothing are part of the “story” (i.e. are there cowboy boots or a skirt that’s essential to give the picture character?). Consider the background. Does it contribute to the overall image or is it a distractor? If you’re uncertain, remember it’s digital, shoot a variety and as much as you can get away with. As long as your “talent” is willing to try different poses and settings, experiment and see what works. When I shoot engagement sessions, I like to drop back and get full body in certain shots, but love to get in close to catch the emotion and intimacy in upper torso only shots of the couple as well. Another thing to consider is posing different heights of people, try to get their heads as close to each other as possible. This may mean sitting people down on set of stairs, having kids stand, etc. I’ll write an article about posing individuals, couples, small and large groups and put more detail there.
Well done. Always enjoy watching you teach.
This was a fun one to do!